Pages

Wednesday, December 29, 2010

Finishing up the year

I have a couple of projects to share with you from the past month.  I have been creating, but not blogging.  I'd make a New Year's Resolution about blogging more often, but that resolution may go the way of many and not be realized.  So I won't make the resolution! lol 

I hope you have a wonderful New Year with lots of fun and time to do the things you love most.  Enjoy the following posts. 


A card I made to send to the troops.  I made a bunch of these so that they could be sent to the troops and the troops would have time to receive them and then be able to send them back home to a loved one for Valentines.  This was a challenge made by Gretchen Barron on her blog.  The card design is a CAS of Rhonda Beadell.


Next, a gift using DSP on letters from Joanne's.  Of course I had to bling them up just a tad.


Exploding gift boxes.  These boxes use just one sheet of 8.5x11 card stock plus DSP or stickers as you desire.  These are filled with chocolate. :-)


My first ever Hanukkah card made for my friend Dan. 


A little bitty lantern.  Soooo cute.  The idea came from a fellow demonstrator (and very nice person I might add) Laura Lipe.  I changed mine up a bit from hers.  This was a club project for December.  Inside is a flame-less tea light. 


Another December club project.  Chocolate Ghirardelli squares are always a great gift, but when presented in this decorative box...well they become just a little more special, yes?


And the final club project for December was punch art gift tags. 

Tuesday, December 14, 2010

Three more Christmas cards

One of the nice things about Stampin' Up! is the people you meet as a demonstrator.  I belong to a group of demonstrators here in the Reno area.  A few of us are orphans, meaning our uplines are gone.  To support each other, we get together and play and talk shop.  We got together a week ago and made Christmas cards.  Below are some of the cards others brought to. 

The first card is designed by Lynnette Parker.  Her stuff is always wonderful.


Next is a card provided by Mary Cargill.  I didn't finish it while there, so mine looks a bit different than hers.   I just love the sparkle of the card.  The trees are stamped in wild wasabi craft and then embossed with irridescent ice embossing powder.  Really pretty IRL.


And finally is a card from a newbie to our group, Nancy Stafford.  This card is too cute.  Easy to put together as well--a huge bonus for Christmas cards if you're going to make a lot!  The card is basically punches punched, cut and arranged into Santa's jolly face.  Makes me laugh that just by placing the eyes a wee bit differntly, you can gve Santa lots of expressions!  I was going for a jolly expression, but he actually looks a little baffled to me.  Ah well, that more clearly reflects me! lol

Tuesday, December 7, 2010

Details on Greenhouse Garden and Concord crush post and a birthday card

First, I want to share a birthday card I sent to a customer.  A sun flower for a sunny person! 


Next, on my last post, I was left a comment asking for the details on the card below.  Thanks for the comment!  I adore getting comments!  Another picture of the card, and then the specifics for making the card:


Stamps used: Greenhouse Garden, Afterthoughts (Hostess set in main IBC)
Inks: Early Espresso, Wild Wasabi (for the flower stems) and Concord Crush (To make the flowers, ink your stamp, then stamp off once on a scrap paper before stamping on the project.  When adding the flower detail, that is inked and directly stamped.  It makes it look like two colors, but both are Concord Crush, one is just lighter than the other due to amount of ink on the stamp.)
Card stock (CS):
Early Espresso, 4.25x11, 2x2.75, 3x2, 1x5.25
Crumb cake: 4x5.25, 1.5x2.25
Concord Crush DSP from the Hostess level 1 paper pack. 2 7/8 x 1 7/8
Whisper white punched with the XL Decorative Label Punch found in the Holiday Mini on page 25.

Dry embossing using the Backgrounds Texturz Plate #1 on page 215 of the IBC.  I took a sponge and lightly highlighted the raised portion of the paper with Early Espresso ink.  Use a light touch.
The scallop down the right side is the Scallop Trim Border punch done in Early Espresso CS.  I then added the smallest pearls from the jewel package of Basic Pearls on page 188. I wrapped a piece of 1/2" Concord Crush ribbon over the punch strip and tucked it under the scallop strip and Crumb Cake piece.

To finish the card, use a Corner rounder punch on the small piece of Crumb Cake, add Silver brads to the centers of the flowers and pop the flower image up on Dimensionals.  To make the faux brads in the left corner, punch three 1/4" circles out of Concord Crush CS and adhere to the front with Mini Glue Dots. The VERY LAST THING you should do is add some Crystal Effects to the little circles to add the shine.  These will need to dry, for a bit, but when they are dry, they look like brads!

There you go!

Thanks for stopping in.  I appreciate your time.
Kristine

Tuesday, November 30, 2010

Greenhouse garden in concord crush

This is a card I did for my demo swap group.  Something about the concord crush and the espresso spoke to me.  I tried a different layout (yeah, some of us tend to get in a layout rut) and I really like how the flower focal point pops off the card.  The background is embossed and then sponged with espresso ink to make the design stand out a bit.  Baby pearls along the side add a little somthin' somethin'.  The DSP behind the flowers is from the Patterns Paper Pack that is the Hostess Level 1 gift.  You know, those packs are great.  I am always pleasantly surprised by what's in them!  To finish the card, I punched three 1/4" circles, adhered them with mini glue dots and then put some shine on them with crystal effects for the faux brad look.  The sentiment is also a hostess level 1 set called Afterthoughts.  It's true...I do love being spoiled!


If you would like any more details on the card, drop me an email.  If you would like to receive the hostess paper patterns pack or the Afterthoughts set, contact me about hosting your own workshop!
Thanks for stopping by.
Kristine

Friday, November 26, 2010

Some more Christmas cards

I have continued making Christmas cards.  You'd think I have enough by now!  Here are a couple more to share.

The first card is one of my favorites.  It came together easily for my, which is unusual, and I still like it after looking at it days in a row! lol  The paper is from the Nursery Specialty Suite DSP.  I would not have thought to look in this DSP for Christmas paper, but as I was browsing my papers, this pattern popped out.  It's always fun to use a paper for a purpose it was not intended.   Makes me feel like a rebel!  Wohoo, I'm such a wild and crazy girl. :-)  Now the bow...oh my.  I went to Lee Conreys blog, and she has these magic bow makers for sale.  Yup, bought one.  Love it!  Hey, doesn't my bow look fan-tas-tic!? And the bows just whip right up.  Ain't nothin' but a thing!  Thanks Lee!  The punch is from the Martha Stewart collection.


The next card is for my Open Swappers group.  This is a card making group that swaps once a month for four months.  Materials have to be Stampin' Up!, but they do not need to be current.  If you would like to be a part of the next swap group beginning in January and continuing through April, please contact me.  I can give you all the specifics.  It's fun, and you get to use anything SU!  Anyway, onto the card.  This card has an old fashion feel to me.  I really like it, but it got mixed reviews from my family.  I did one of my new favorite tricks on this card, which is to adhere DSP before running it through the Big Shot with an embossing folder.  I like the look!  All of the edges of the paper are "frosted" with craft white.  I liked using the eyelets again too!  I wonder why they went out of vogue?  I would love to know your honest opinion about the card.  Leave me a comment!


Next is my very sweet daughter, Olivia.  She wanted to do the Mojo Monday challenge for one of her Christmas cards.  Here she is with her finished card. 


And here is the sketch she followed...


And here is the close-up of her card.  Beautiful!!  I think this is one of her best cards.  It's hard to see in the picture, but the snowflakes have dazzling diamonds on them!  A little pretty bling!  As you note, she used the Magic Bow Maker too.  Soooo easy!


I have more cards to share, but will save them for another post.  Thanks for stopping by.  I hope your Thanksgiving was a wonderful time with family and friends, and you had some time to stop and reflect on all that you have to be grateful for. 

Kristine

Friday, November 5, 2010

Catching up

I have a few items to show you that have been sitting in my work area.  The first card was for a demonstrator swap.  I decided to forgo the usual fall colors.  The front squares are popped up on dimensionals.  This card uses the Days of Gratitude set as well.  Such a versatile set!


Next up is a card for fall using the masking technique. 


The next card was one I did for the last Christmas card class.  It uses the letterpress Season on Joy.  I'm not a natural at using a letterpress, but some of my customers were pros!


My next share was a club card for Halloween.  It is almost a direct CAS from Paper Crafts Magazine.  It is the same layout and colors, but I used SU only stamps and materials.  The technique is faux letterpress, which I like MUCH better!


And my final share is of my constant companion, Simon.  He was all dressed up for Halloween. :-)
My daughter decided he should wear her outfit.  He doesn't look too pleased does he? lol.

Thanks for stopping by today.
Happy Fall!
Kristine

Friday, October 8, 2010

Day of Gratitude

This stamp set was the first one to catch my eye when the Holiday Mini came out.  It reminds me of one of my favorite retired stamp sets called True Friend.  Both sets have the same design style--a little western, a little ...Scandinavian?  At least that is what I think when I look at them.  I really like the sample card that is pictured with the set in the mini, so I decided to stick with the Cajun Craze color.  The layout is courtesy of Stampin 411 blog Saturday Sketch Challenge #171.  This will be one of the cards for my club this Friday.  I like the rich, warm colors of it. 


The DSP is the Autumn Spice.  Doesn't that sound wonderful?  Makes me think of warm apple cider.  The ribbon is in Early Espresso, and I used the lattice embossing folder on the Cajun Craze panel for some extra texture.
Here is the inside of the card.


Wonderful sentiment, yes?  I sometimes need the reminder that everyday is a blessing and a reason to be grateful. 

Thanks for stopping in today.  Remember to feel the gratitude today for all of your blessings!
Kristine


Tuesday, October 5, 2010

Halloween past

It's finally feeling like Fall here in Reno.  It has been raining the past couple days, and the temperature outside right now (according to my computer) is 48*.  I can actually wear a sweater!  This is my favorite time of year. :-)  It is also a favorite month for many because of Halloween.  So today I thought I'd share with you some cards made by some super talented stampers who have made some wonderful Halloween cards.  Maybe they will inspire you to get your spooky on! :-)

The first two cards are made by Lynnette Parker.  She is Ah-MAZ- ing!!  Truly.  She should have her own blog to share her giftedness with us all.  Alas, she doesn't, so I will share her giftedness with you!  This card is made with the spider embossing folder.  Stinkin' cute, huh?! (Lynnette, I bet you're wondering how I got this card.  Me no say!)

This next one was from Lynnette last year.  Such talent. {sigh}


Next up is my wonderful  friend Jennette Sworthout.  She is one of those people who have an eye for color and balance.  Not that I'm at all jealous. :-)  This was her card last year.


Love it?  YES!

Next up is my friend and upline, Kim Goodsell.  This card was made awhile ago, but I love it!  It has softer colors for Halloween.  This was a card some of you may recognize from one of holiday stamp camps. Love the layout.


And the final card is mine.  Halloween is not my forte, so I go more fallish in design.  I used the gate fold on this card.  What I like about the card is that just by switching out the DSP and the ribbon, you could do any season! 


Pull off the ribbon and here is what it looks like...


Well, I hope these cards inspired some of the spook in you. :-)

Thanks for taking time to visit. 
Kristine

Saturday, October 2, 2010

MOJO 158

Two weeks in a row for the Mojo Monday challenge!  This week the sketch came in handy for my DH's birthday.  With a busy week, his card was still in the makings when he came home from work.  Yikes!  I love the simply sketches, and this one worked well for his card.  Whenever I show him my work, he always likes the simpler design cards best.

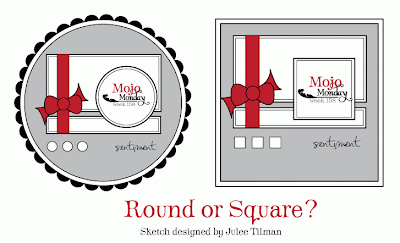
Here's the sketch:


I chose the square version.  Here's my DH's card:


There is a little sparkle to my card--just like my hubby. :-)
I used the Sizzix Squares texturz impression folder to add a little somethin' somethin' to the back panel of the card.  I'd show you the inside, but the note is a mushy gushy one. :-)

Thanks for stopping by today.  Have a good one!
Kristine

Friday, September 24, 2010

MOJO 157

It's amazing, but I found some time to play along with the Mojo Monday sketch this week.  I used mostly retired items in the making of this card.  I tend to always want to play with my newer stuff, but I have so many retired things to use.  Here is the sketch:


Here is my interpretation of the sketch.


The large flower is a die cut on board that has been inked with More Mustard craft ink and then embossed with clear embossing powder.  It looks almost leatherish to me.  The sentiment is from a set called Absolutely fabulous.  I like the continuation of the sentiment on the inside of the card which says, "No seriously, ...you are." 

It's a GORJUS day in Reno today.  Time to go play in the sunshine.

Thanks for looking.
Kristine


Thursday, September 23, 2010

More Christmas cards

I'm continuing to make Christmas cards.  I will be making these two cards with some ladies on Saturday for a Christmas Card Class.  If you are interested in making either of the cards on your own, I do offer card kits for both.  Just send me an email and I'll reply with the particulars!

One of the ladies coming to the class loves blue and white.  This card is in her honor.  It uses the new snowflake embossing folder and the basic rhinestones.


This second card is really stunning in person.  It's the kind of card people want to touch because of the sparkle.  The sparkle is done with heat and stick powder and dazzling diamonds.


The sparkle is not showing up in the picture. :-( I need to learn how to take better pictures!

Hope you like the cards. 
Kristine

Sunday, September 19, 2010

First Christmas card of the year

I have created the first Christmas card of the year.  Yes, it does seem way too early for jingle bells, holly and the manger.  But the weeks are short for those of us making cards!  I like simple cards that mail easily.  Well, let me clarify...I love wonderfully ornate cards, but for mailing lots of them during Christmas, the simpler the better.  With that in mind, I created this simple card.  Another bonus is that it is easily mass produced.  (Sorry friends, I do not make individual card designs for each of you.  Alas, I may appear crazy, but I'm not!)  I like the sentiment of JOY for a Christmas card.  Although Joy is there in every day of Life, more folks seem to find it in the holidays.  Lookie:


I'm grateful to SU for adding bling to the inventory line-up.  The pearls are wonderful.  Lots of sizes and easy to use.  Plus, I'm a pearl girl. 

Thanks for sharing a moment of your day with me. 
Kristine

Monday, September 13, 2010

Inspiration and another scrapbook spread

It is rare that I create a card that I instantly like.  But the card in this post is one of those rare gems.  Stampin' Up has some new cork sheets (119819, 9.95 for 6) and when I saw them, the first thing I thought of was the bulletin boards at schools.  Must be the former teacher in me.  So, of course, my card ended up with a school theme.  When I designed the card, I had two things in mind.  First, a customer, Susie (Hey Susie!) liked this kind of fold for a card, so I wanted to incorporate that.  Second, I wanted to use the Define your life Stamp set.  Take a look...what'cha think?


Here's the inside of the card.


I used the spiral border punch to make it look like a sheet of binder paper.  My daughter wondered where I got the small piece of paper.  :-)

I also created another scrapbook spread for Kyle.  I am really enjoying making this book for him.


Isn't he a doll! 
Here's closeup of each page.


He's not even a month old in these pictures.  Such an alert boy!

Thanks for spending some of your time with me today.  Hope your day ends up being a lovely one.
Kristine

Friday, August 27, 2010

Back to school and something cool

If your household has been anything like mine, you're looking forward to school starting on Monday.  This time of year always reminds me of my own school years--the school supplies and the clothes and the anticipation and nerves about seeing classmates after a summer away.  My children are excited to go back, for which I am grateful.  Back to school time can also be expensive.  Fortunately, my children have never been worried about keeping up with others and are willing to use again supplies from last year.  This year, my daughter was okay not getting new colored pencils, but really wanted a new pencil box.  We compromised and she picked out some of my designer paper and we created a box to hold the pencils.  It's nice that she still thinks something I create is cool.  Very simple, but it made my daughter smile!


A loop of hemp around the buttons keeps the box closed after the tray slides back into the outer box.  Don't those buttons look yummy?  They are the new buttons in the brights collections. They remind me of sour candy! My daughter likes that she can pull the tray out of the box and not have her pencils roll around her desk.  We also had a good time creating the box.  Stampin' Up! save me again! lol

This next card was a card I made back in January.  This is the cool part.  I was looking at pictures of the Stampin' Up convention that were posted by another demonstrator.  Lo-and-behold, one of the pictures was of my card, which had been posted on a display board at convention!  One of my cards made it to a display board at convention!!  Besides that, this other demonstrator liked it so much she took a picture of it so she could use the idea in her own workshops!  That is too cool!  Stampin' Up encourages us to send sample cards to them so they can use them in displays or in the magazine.  But not every card they receive makes the cut.  Just imagine how excited I'd be if one of my cards made it into the magazine.  My family would not be able to live with me! lol.  Here it is...


I wish all you moms out there the peace and quiet of your family away at work and school.  Get some stamping done! :-)
Kristine

Wednesday, August 4, 2010

Be yourself

Today I wanted to create a card using a technique showcased in the Stampin' Success Magazine.  In this technique you use a piece of felt and reinkers as your stamp pad.  It allows you to use a single stamp and stamp it once and not have to use markers to get the different colors. It's a great technique when you'll be making many cards of the same design (such as a Christmas card) and do not want to re-marker the stamp for each card.  It is fast! I used the Happy Together set with the three birds.  I find this set of three birds funny.  The middle bird just seems to be marching to her own beat. I played this up by giving the middle bird (that sounds almost naughty!) a different color and some bling.  She also has some "lip" stick too.  Lipstick on a bird...okay, that just makes me laugh.  The sentiment says, "Be yourself," and on the inside of the card, it says, "Nobody is better suited." 


I added a flower from an old pretties kit, but you can now buy them without buying the whole kit. They are called paper daisies and you can find them on page 188 of the catalog.  I sponged some Pear Pizzazz onto it to make it blend better and then topped it with a knot of the new In Color Ribbon in Pear Pizzazz.  The DSP is from the Nursery Suite Specialty.  I think Pear Pizzazz is going to be one of my favorite colors!

Thanks for taking the time to stop by today.
Have a good one!
Kristine

Tuesday, July 27, 2010

SSUS swap and a double page

I did get the latest card photographed, so here's the post.  I made this card for a swap in the Sensational Stampin' Up Swappers group I belong to.  I used the new set Just Believe and some of the new DSP from the package Walk in the Park. The paper looked like smooth stones covered in moss to me, and that made me think of an Asian garden, and that sparked the design.  The three "pebbles" on the left side of the card are the clear dots that belong to the build a brads!  I wanted to continue with the pebble idea, and these were the size I wanted.  The colors are directly out of the new color coach.  At first I thought Wild Wasabi and Perfect Plum? Really?  But I decided to try it.  At first I was non-plussed by what I had designed.  But the more I look at it, the more I like it!

I stamped the image in black Staz-on and then "highlighted" the plant with my markers.  Not sure about the sponging around the edges.  I left that off on the swaps I made for the gals.

Next is my latest pages in my girlfriend's new baby scrapbook.  The paper is retired, and called Muirfield.  The color is the returning color Baja Breeze.  Such a wonderful hue of blue, don't you think? 


Thanks for taking some time to spend here today.  Have a great day!
Kristine